
Create a Wedding Band Project on iJewel3D
Create a Wedding Band Builder project and customize its assets - no code required
Assets Setup explains what the building blocks are. This page shows you how to put them together on iJewel3D: create a project, replace profiles, swap materials and icons, edit project defaults, synchronize folder changes, preview the result, and publish it for an integration. Everything here happens in the Drive file browser; normal setup does not require editing JSON by hand.
Release baseline
This workflow is documented against Mini Viewer 0.6.18. This baseline includes material variants, outside and inside material features, the Modern Metals layout, and configurator Try-On. Releases older than 0.6.11 also lack the final Wedding Band iframe ready and teardown lifecycle.
Plan requirements
The Wedding Band Builder is available on every iJewel3D plan, from Free upward. The New Wedding Band option appears at the root of your Drive.
| What you get | Plan |
|---|---|
| Wedding Band project with the built-in profile library | Free and above |
Custom profile upload — your own .3dm cross sections | Silver and above |
| Whitelabel embed, with the iJewel branding removed | Gold and above |
Below Silver, the full profile library stays available, and the upload option shows an upgrade prompt.
For the branding options themselves, see Whitelabeling and Branding.
To upgrade, go to Settings → Billing. To request a demo, contact us at contact@ijewel3d.com.
Where this step fits
This is the project-creation stage of the Wedding Band workflow. Complete this page until the project opens correctly in View, then continue to Quick Start to share or embed that project on a website.
What a project is
A Wedding Band Builder project is a special folder in your Drive. It carries the configurator's settings and holds every asset - profiles, material variants, finish icons, paths, catalog rings, UI icons, and diamond assets - as real files inside tidy subfolders. A one-click Sync validates the folder tree, rebuilds every supported asset catalog, and writes Drive-hosted URLs back to the project.
The project folder has two connected layers:
| Layer | What it contains | How it changes |
|---|---|---|
| Drive files | Profile models, PMAT material variants, icons, paths, catalog rings, and diamond assets | Upload, replace, move, rename, or delete files and folders |
| Project configuration | Layout, opening rings, defaults, catalogs, scene settings, branding, and asset URLs | Created from the Wedding Band starter project; folder-backed catalogs are rebuilt by Sync, while behavior fields are edited in Mini Editor |
Sync intentionally rebuilds only the configuration that can be inferred safely from folders. It preserves the remaining Wedding Band settings.
Create a new project
- Go to your Drive root (the top-level folder list).
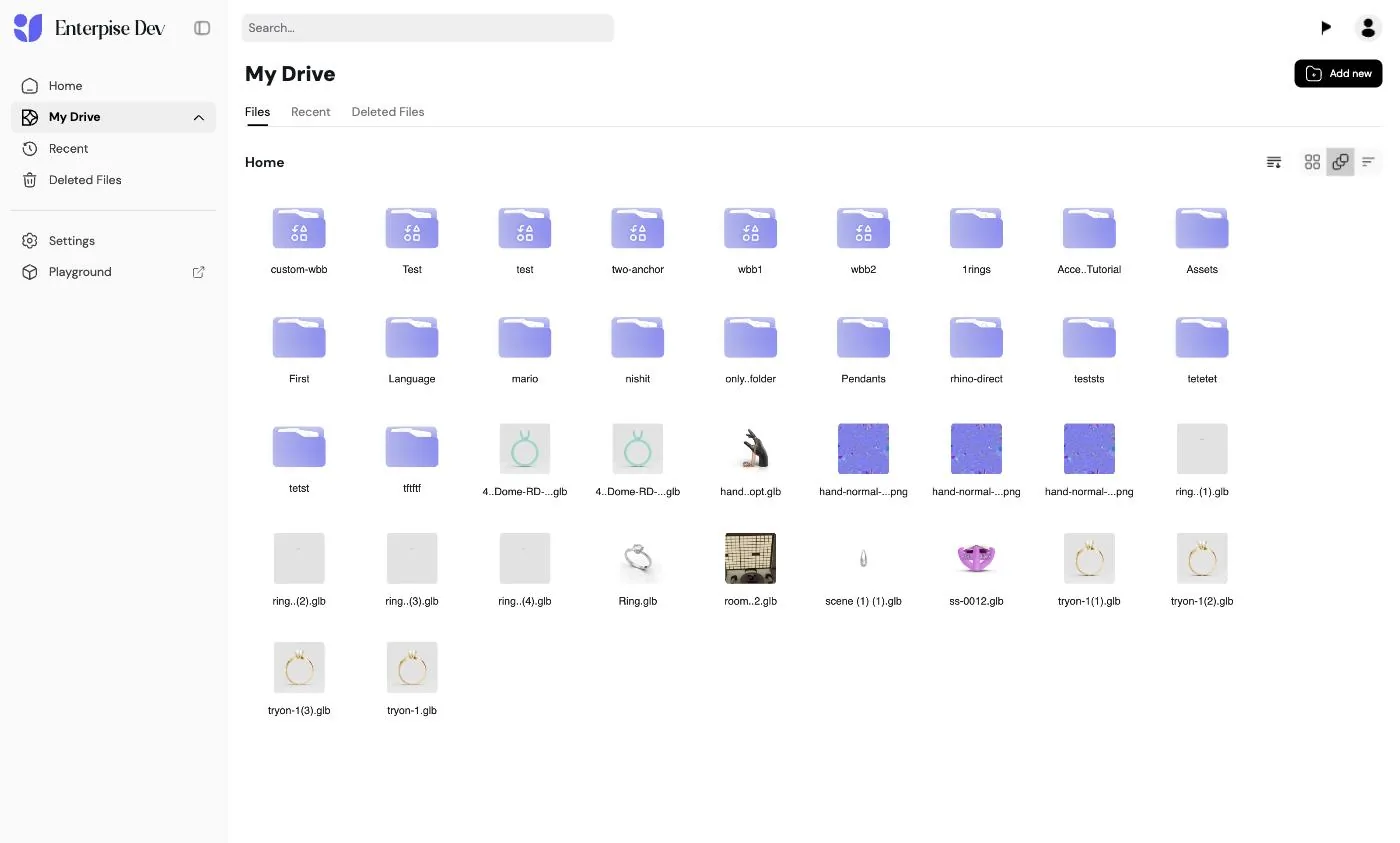
Start at the Drive root, where Wedding Band project creation is available from Add new.
- Click Add new and choose New Wedding Band.
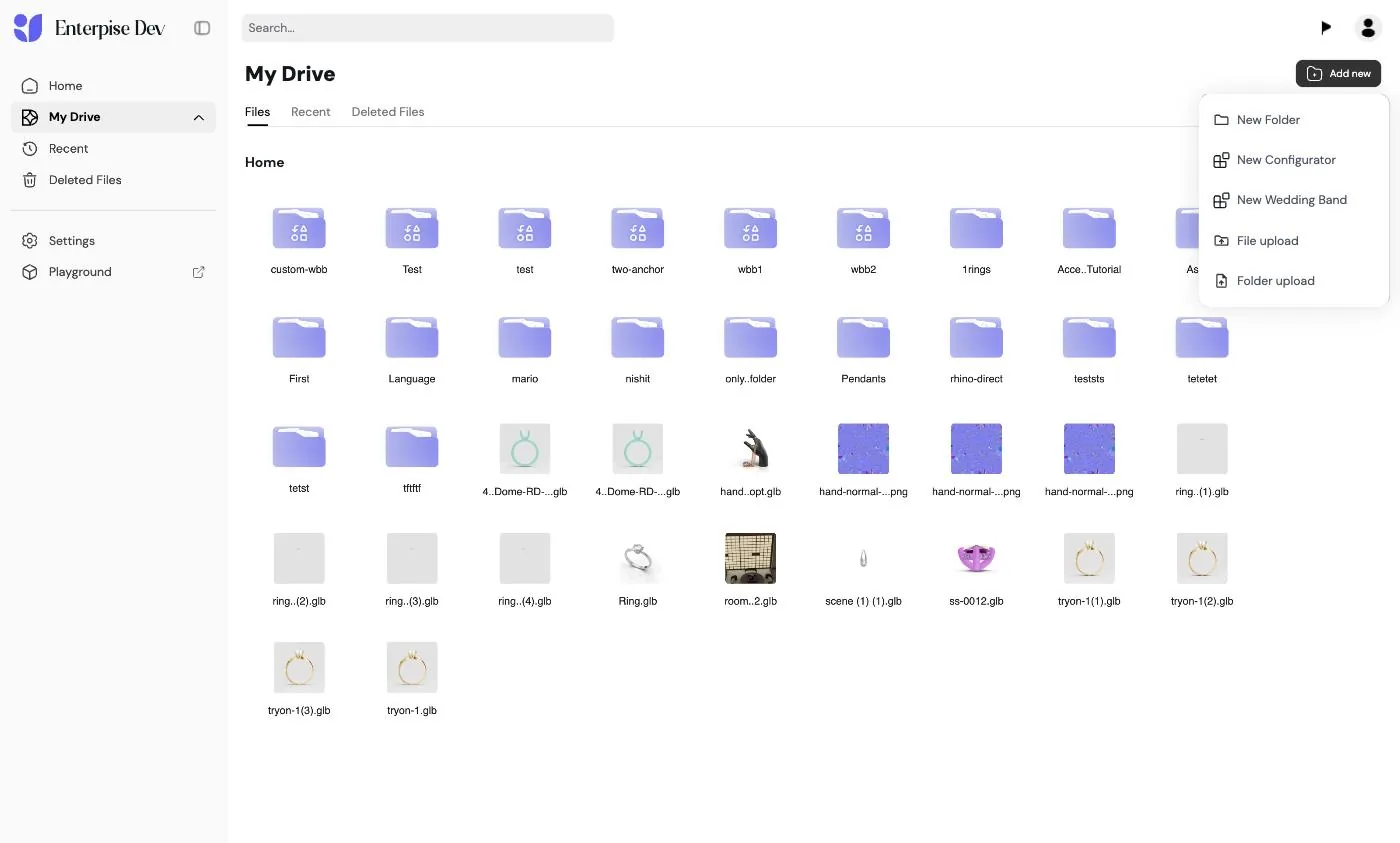
Choose New Wedding Band from the root-level Add new menu.
- In the New Wedding Band Configurator dialog:
- Enter a Project Name.
- Choose a layout. Every card has its own preview image and a Layout link that can point to the hosted version of that layout.
- For Panel or Boutique, choose His Ring, Her Ring, or both.
- Modern Metals always creates one neutral ring. It has no His/Her identity and no add-ring control.
- Click Create project. The button stays disabled until the required name and ring choice are present.
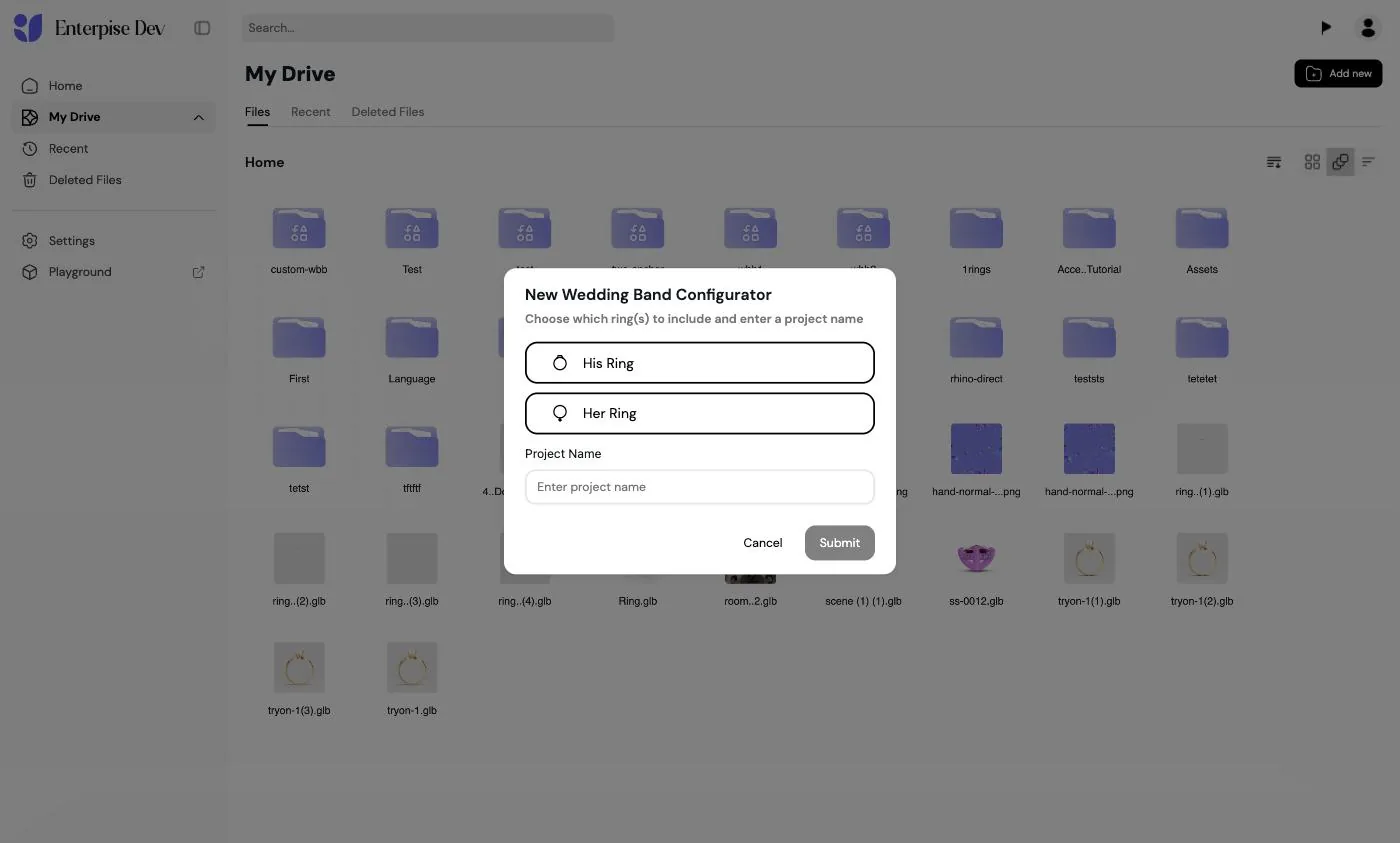
Choose the layout, starting ring configuration, and project name. The exact dialog may contain newer layout cards than this screenshot.
- iJewel Drive creates the project folder and copies in the complete starter kit: profiles, material qualities and finishes, UI icons, paths, catalog rings, and diamond assets.
Open the new project folder to see the starter assets, ready to customize.
What Drive creates
Submitting the dialog starts a complete project-provisioning operation:
- Drive creates a configurator folder with type
WeddingBandBuilder. - It copies the Wedding Band starter configuration and changes its project name.
- It stores the selected layout in
plugins.WeddingBandBuilder.ui.layout. - For Panel and Boutique it filters the starter's
bandslist to His Ring, Her Ring, or both. For Modern Metals it creates one centered ring namedring, disables ring linking, and hides ring management. - It creates the catalog folders and downloads each starter asset into your Drive.
- It refreshes the file browser after the operation finishes.
The current starter project includes:
| Catalog | Starter content |
|---|---|
| Layouts | Panel, Boutique, Modern Metals |
| Rings | Her Ring, His Ring, or both for Panel/Boutique; one neutral ring for Modern Metals |
| Profiles | D-Shape, Flat, Concave, Round, Knife Edge, Beveled, Comfort |
| Band materials | Yellow Gold, White Gold, Rose Gold, and Carbon |
| Material qualities | Gold variants such as 14k, 18k, and 22k; material-specific variants for other bases |
| Finishes | Hammered, Sand, Ice, Nature, Brush, Linear, Polished |
| Color partitions | 1 Color, 2 Color, 3 Color |
| Poses | Default, Crossed, Stacked, Nested icons |
| Diamonds | Single-stone and pave/prongs GLB models |
| UI assets | Logo; profile, dimensions, material, and diamond tab icons; design and cut icons |
Partial project creation
Starter assets are copied from their source locations into your Drive. If one or more downloads or uploads fail, the folder can still exist but Drive reports that the project is only partially populated and identifies the failed assets. Open the folder, replace the missing files, and Sync again instead of assuming that a failure toast rolled back the whole folder.
Understand the folder structure
Inside a project folder you'll find these subfolders:
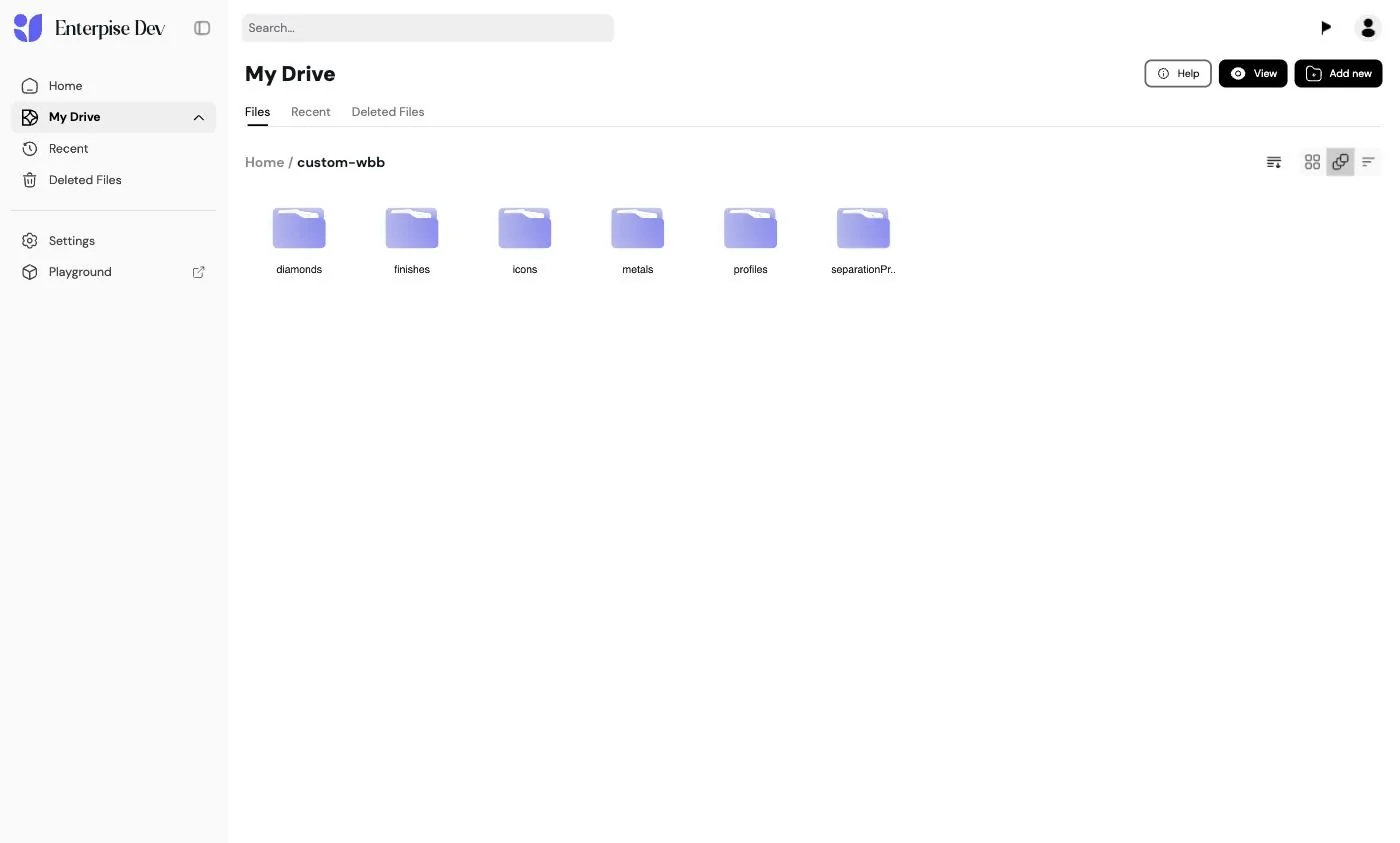
A provisioned Wedding Band project keeps all folder-backed catalogs under one special Drive folder.
<Your Project>/
├─ profiles/            one subfolder per profile (shape model + icon)
│  ├─ D-Shape/
│  ├─ Flat/
│  └─ ...
├─ materials/           base material → quality/variant → PMAT
│  ├─ yellow/
│  │  ├─ material.json
│  │  ├─ icon.png
│  │  ├─ 14k/
│  │  │  ├─ polished.pmat
│  │  │  ├─ brush.pmat
│  │  │  └─ ...
│  │  ├─ 18k/
│  │  └─ 22k/
│  ├─ carbon/
│  │  ├─ material.json
│  │  ├─ 1/default.pmat
│  │  └─ 2/default.pmat
│  └─ _sources/         optional authoring archive; ignored by Sync
├─ finishes/            finish display metadata/icons only
│  ├─ polished/icon.png
│  ├─ brush/icon.png
│  └─ ...
├─ icons/               UI catalog images
│  ├─ logo.(svg/png)
│  ├─ tabs/             profile, dimensions, material, diamonds
│  ├─ poses/            default, crossed, stacked, nested
│  ├─ design/           no-diamonds, full-diamonds, bezel-diamonds, ...
│  └─ cuts/             1, 2, 3
├─ paths/               one subfolder per custom extrusion path
├─ ringCatalog/         engagement/ and memoire/ model folders
├─ diamonds/            shared models plus colors/<color>/ material folders
└─ separationPresets/   (settings only - no files)
Change a folder-backed catalog, run Sync Configurator, and Drive rebuilds the corresponding manifest entries. Configuration-only behavior such as pricing, limits, defaults, compatibility, and separation presets is preserved.
| Folder | Holds | Updated by |
|---|---|---|
profiles/<Name>/ | one 3D shape model + one icon image | Sync (rebuilt from folders) |
materials/<base>/<variant>/ | material.json, icons, variant folders, and .pmat files | Sync (rebuilt and validated from folders) |
finishes/<id>/ | display icon for a finish ID used by at least one material | Sync (icon/name metadata; PMAT files do not live here) |
icons/ | logo and tab / pose / design / cut icons | Sync updates discovered image mappings |
paths/<Name>/ | one path model and optional icon | Sync |
ringCatalog/<type>/<Name>/ | one ring model and optional thumbnail | Sync |
diamonds/ | shared models and optional color .dmat entries | Sync |
separationPresets/ | nothing; the preset definitions remain in project configuration | Placeholder only; not read by Sync or editable as definitions in Mini Editor |
Uploading inside a project
When you upload 3D files into a Wedding Band Builder project, iJewel Drive stores them exactly as they are:
- automatic GLB conversion is disabled;
- compression is disabled;
- automatic centering is disabled; and
- automatic scaling is disabled.
These safeguards preserve the profile curve's units, origin, and shape. Wedding Band folders allow New Folder, File upload, Sync Configurator, and View. Folder upload and the generic Configurator-component workflow are not offered inside a Wedding Band project.
What Sync reads
Sync walks the complete Wedding Band folder tree. It rebuilds catalogs only when their recognized root folder exists, and preserves behavior that cannot be derived safely from files.
Profile discovery rules
For every direct subfolder of profiles/, Drive:
- uses the folder name as the profile's display name;
- creates its ID from the lowercased folder name;
- uses the first supported 3D file as the profile model (
.3dm,.glb,.gltf,.fbx,.obj, or.stl); - uses the first image as the icon (
.svg,.png,.jpg,.jpeg,.webp, or.gif); and - preserves the profile's existing engraving offsets when the folder name still matches an existing profile.
If a model or icon is temporarily missing, Sync retains the matching existing URL when possible. Keep only one intended model and one intended icon in each profile folder so discovery is unambiguous.
Material discovery rules
The material tree has three axes:
materials/<base>/<variant>/<finish>.pmat<base>is a stable material ID such asyellow,carbon,marble, orwood.<variant>is the quality or sub-category shown by the UI, such as14k,18k,22k,koa, orblack.<finish>.pmatsupplies a selectable finish such aspolished,brush, orhammeredfor that exact variant.
For every direct base folder under materials/, Drive:
- ignores base and variant folders whose names start with
_or.; - reads optional
material.jsonmetadata from the base folder; - uses every direct child folder as a variant/quality;
- validates every
.pmatas JSON and rejects dangling texture-map UUIDs; - derives the variant and material swatch from
default.pmat, thenpolished.pmat, then the first PMAT; - derives selectable finishes from PMAT filenames; and
- derives the legacy
metalspicker from materials whoseusagecontainsband(or whose metadata omitsusage).
These filenames have special meaning:
| Filename | Meaning |
|---|---|
<finish>.pmat | Selectable finish and runtime material for that variant |
default.pmat | A material/variant with no finish axis, such as a wood or carbon pattern |
_<finish>.pmat | Structural fallback available to the renderer but hidden from the finish picker; _polished.pmat is commonly used for a polished interior |
If both polished.pmat and _polished.pmat exist, the non-prefixed file wins. For a band material, each variant should normally provide polished.pmat or _polished.pmat; Sync warns when the polished interior is missing.
material.json
material.json is optional, but strongly recommended. If it is missing or cannot be read, Sync uses the base folder name as the display name, the first variant as the default, and treats the material as available for every role. That fallback can make an inlay-only material appear in the main band-colour picker.
{
  "name": "Yellow Gold",
  "kind": "metal",
  "usage": ["band", "inlay", "overlay", "sleeve"],
  "defaultVariant": "18k",
  "defaultFinish": "polished"
}
Recognized usage values are band, inlay, overlay, and sleeve. For example, the current starter uses Carbon as a band material, while Marble and Wood are offered for inlay/overlay roles. Only put a role in usage when that material is manufacturable there.
Finish display rules
finishes/<id>/ now holds only the display icon for that finish. The list of available finishes comes from the PMAT files under materials/; uploading an icon does not create a finish unless at least one material variant has a PMAT with the matching filename.
Configuration Sync preserves
Sync preserves configuration that has no unambiguous folder representation, including:
- included bands and their default state;
- the selected UI layout and theme;
- color-separation presets;
- project-level asset base URL;
- defaults, compatibility, limits, pricing, scene, camera, branding, and embed settings; and
- profile engraving offsets that can be matched by profile name.
Sync does rebuild profiles, materials, finish display metadata, UI icon mappings, custom paths, engagement/memoire catalogs, shared diamond models, and diamond color entries when their recognized folders are present.
Update profiles
A profile is the ring's cross-section shape. Each one lives in its own subfolder under profiles/, containing a single 3D shape model and one icon image (the swatch shoppers tap to pick the shape).
Custom profile upload needs Silver or above
These steps need the Silver plan or above. On a lower plan, your project uses the built-in profile library, and the upload option shows an upgrade prompt.
To add or replace a profile:
Open the project's
profiles/folder.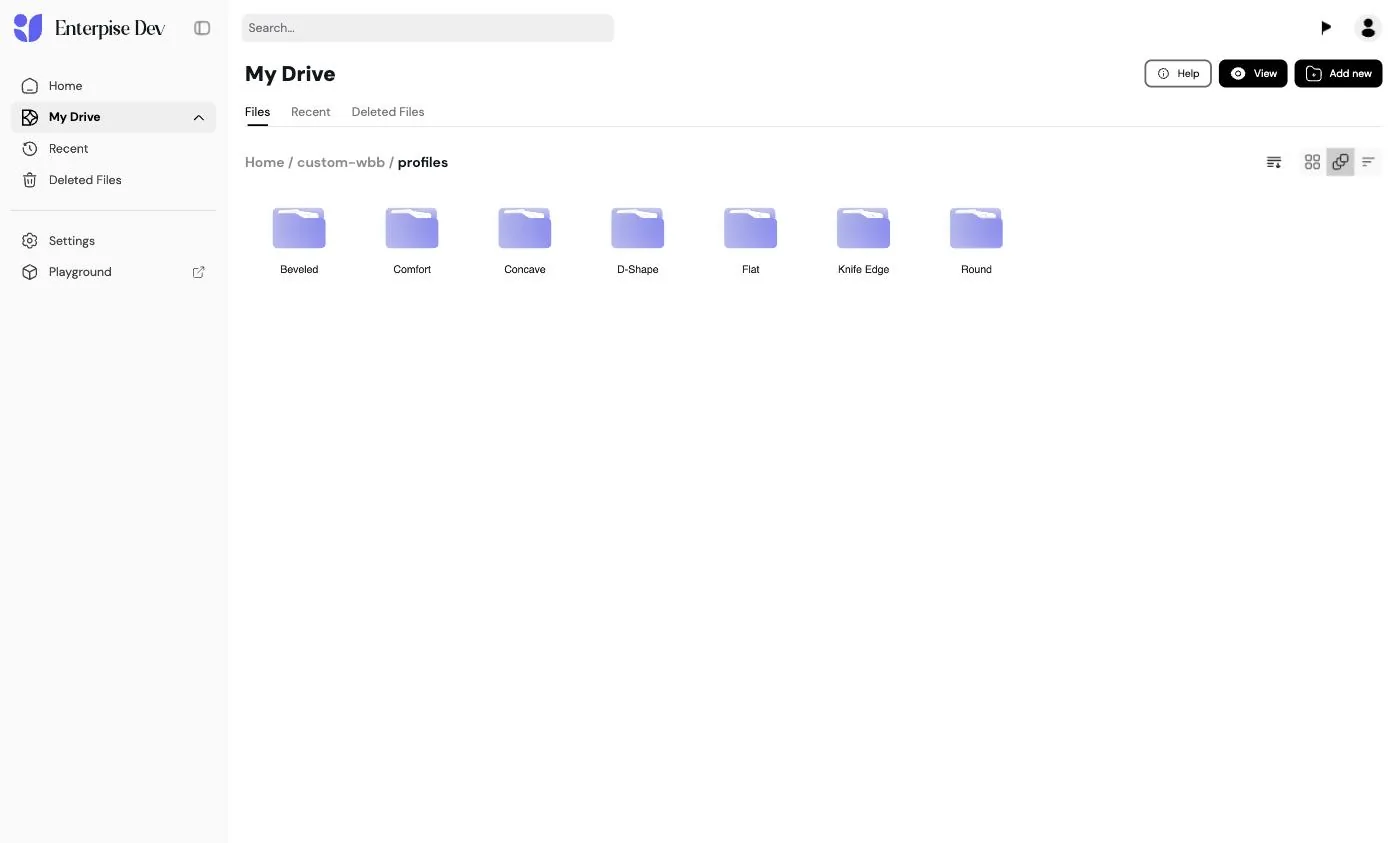
Each direct child folder becomes one profile option after Sync.
Create a New Folder named for the profile (e.g.
Milgrain). The folder name becomes the profile's display name in the builder.Open the new folder and upload the shape model (a
.3dmfile with a single closed 2D curve) plus an icon image.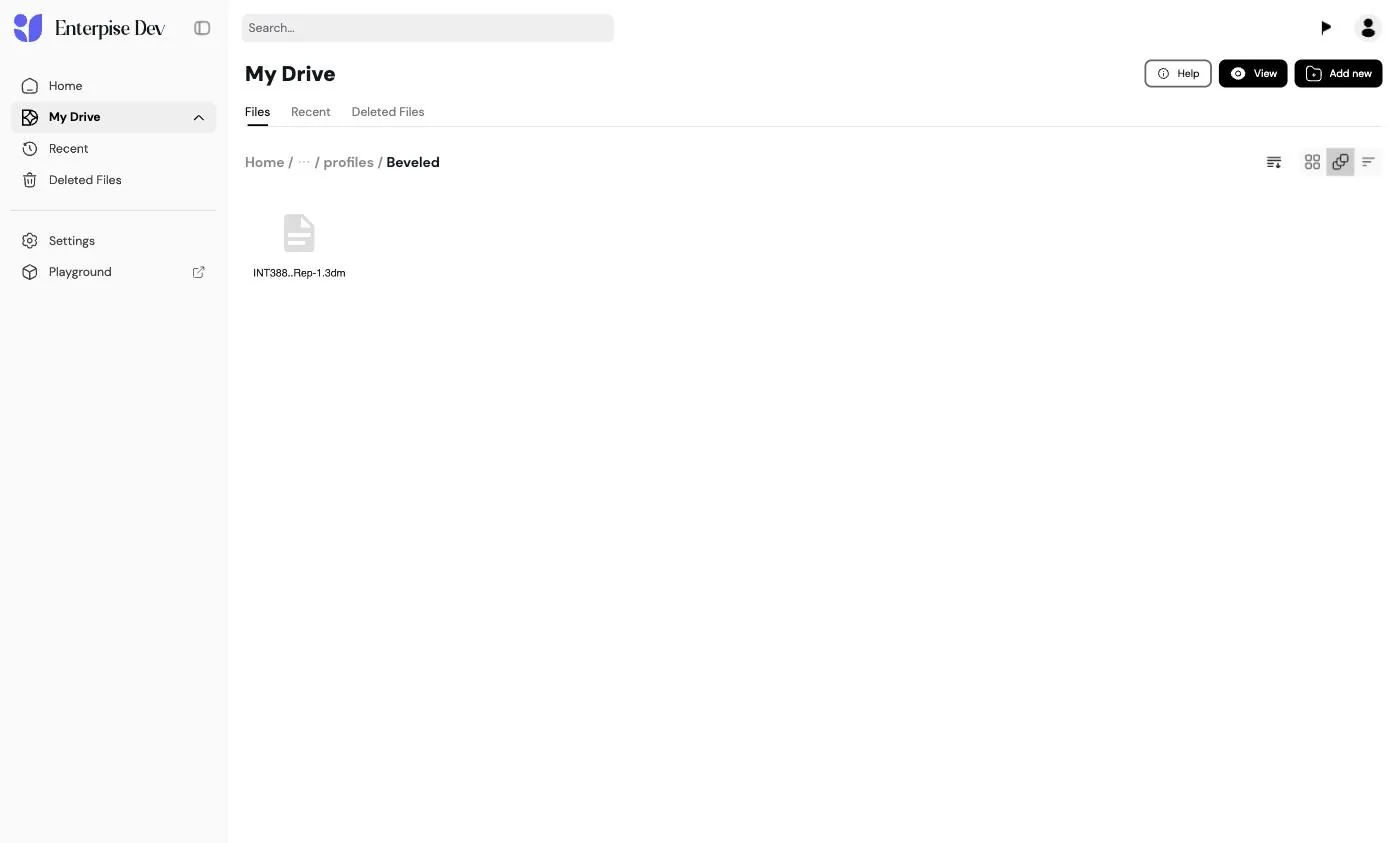
This existing profile shows its 3DM shape model. When adding a profile, upload its picker icon in the same folder as well.
To swap an existing profile, open its folder and upload replacement files.
Click Add new → Sync Configurator.
On Sync, each profile folder becomes a profile in the builder - its name comes from the folder, and its shape and icon come from the two files inside.
WARNING
The profile curve must be drawn at accurate millimeter dimensions - the builder uses its real size as the base for width and thickness. A wrongly-scaled curve throws off every dimension, weight, and price. See Assets Setup → 2D Profiles for details.
Update materials, qualities, and finishes
A base material such as Yellow Gold owns its qualities and finishes. To add a new material manually in Drive:
- Create
materials/<base>/, using a stable lowercase ID such asplatinumormeteorite. - Add an icon image and a
material.jsonfile to that base folder. - Create one child folder per quality or sub-category, for example
950,14k,18k, orblack. - Upload the PMATs for that exact variant. The filename without
.pmatis the finish ID:polished.pmat,brush.pmat, and so on. - If a finish needs a picker icon, put the image in
finishes/<finish-id>/. - Run Sync Configurator and inspect the Sync report before opening View.
Example:
materials/platinum/
├─ material.json
├─ icon.png
└─ 950/
   ├─ polished.pmat
   ├─ brush.pmat
└─ hammered.pmat{
"name": "Platinum",
"kind": "metal",
"usage": ["band", "inlay", "overlay", "sleeve"],
"defaultVariant": "950",
"defaultFinish": "polished"
}Uploading files does not edit the saved manifest immediately. Sync is the publication step: it reads the new folder structure, validates PMAT contents, derives the material/variant/finish catalogs, and then saves the project.
Test every role you enable
usage controls where a material appears. A material marked band is offered as the main ring body. inlay, overlay, and sleeve expose it in those role-specific controls. Omitting usage enables every role, so do not rely on that fallback for production classification.
Authoring sources and runtime files
materials/_sources/ is an optional workspace for master PMATs or generation inputs. Sync ignores it completely. It does not need to be uploaded to a CDN or Packs for the configurator to run; upload it only when you deliberately want an authoring archive.
The runtime files are the PMATs inside visible base/variant folders. Keep only the current derived PMATs there. Use default.pmat for a variant without a finish picker, and _polished.pmat only as a hidden structural/interior fallback.
Other folder-backed catalogs
The starter also provisions these Sync-managed folders:
- Icons (
icons/) - logo, tab, pose, design, and cut images. - Paths (
paths/) - custom extrusion path model and optional icon per folder. - Ring catalog (
ringCatalog/engagement/andringCatalog/memoire/) - one model and optional thumbnail per ring folder. - Diamonds (
diamonds/) - the shared single/prongs models and optionalcolors/<id>/folders containing.dmatfiles and icons. - Finish display metadata (
finishes/) - icons for finish IDs discovered from material PMAT filenames. - Separation presets (
separationPresets/) - a placeholder only; preset definitions stay in project configuration.
About assetBaseUrl
Each project has a base URL used to resolve relative asset references. Sync replaces discovered assets with Drive-hosted URLs while preserving assetBaseUrl for references that remain relative. You normally do not need to edit it.
Upgrade a project made before the material tree
Sync repairs a project whose materials still sit in an older folder shape. It creates missing base folders and material.json files, removes empty legacy files/ folders, and publishes the rebuilt catalog. The step is resumable: if any move or publish fails, the project keeps its current state, and the next Sync continues safely. A project already on the current tree skips this step.
Do not change the top-level project version
Keep the top-level "version": "v1" in the project JSON. It describes the viewer file format, and the Wedding Band plugin tracks its own version field separately.
Sync your changes
Drive requests a configurator sync after several successful file-browser operations inside a configurator, including uploads, moves, deletes, renames, folder creation, and some metadata updates. A manual Sync remains the clearest way to finish a batch of related changes and confirm the saved state.
After changing any folder-backed catalog, click:
Add new → Sync Configurator (or the Sync button in the toolbar).
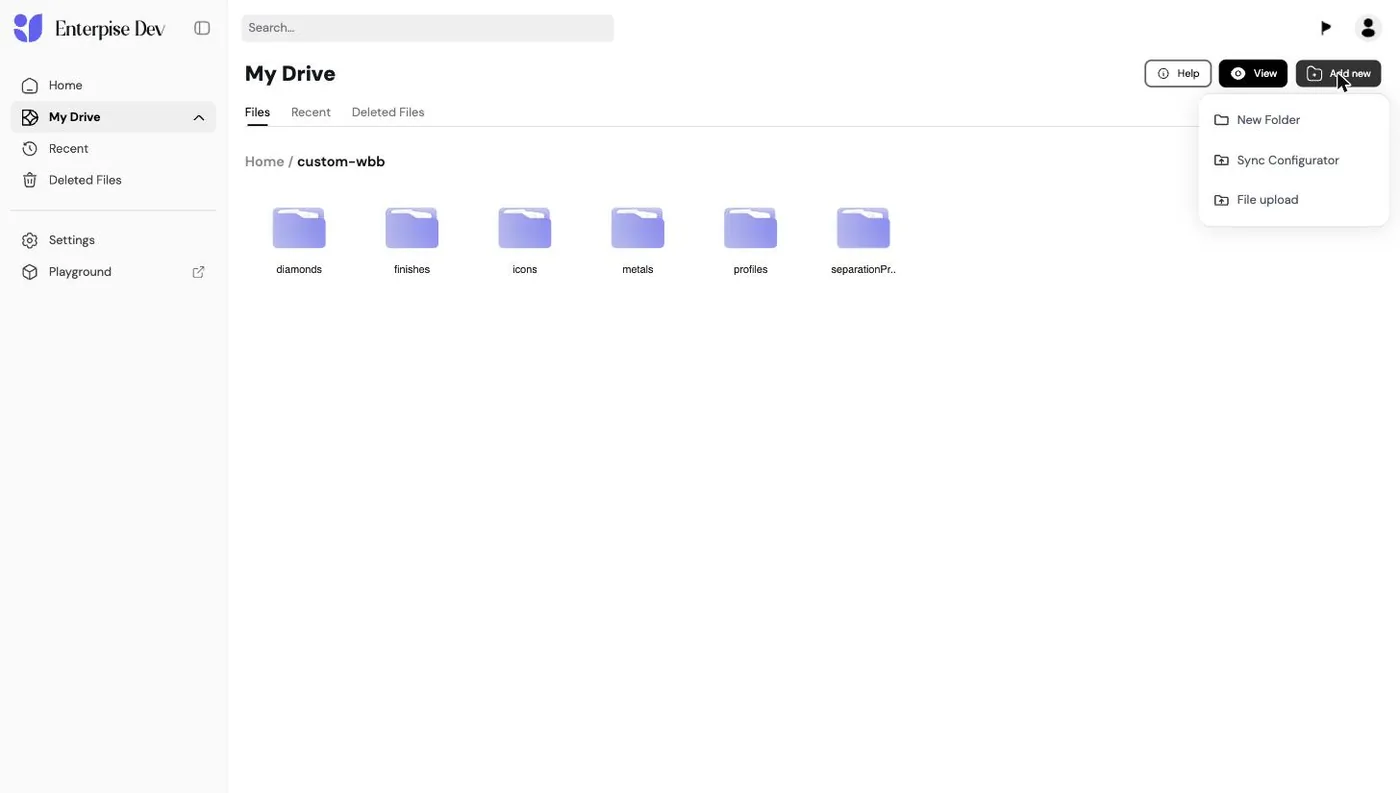
Inside a Wedding Band project, Add new provides folder creation, file upload, and Sync Configurator. The View button remains available in the toolbar.
Sync performs any required schema migration, validates the project tree, rebuilds its supported catalogs, and saves the configurator only when the publish result is valid. The Sync report shows errors and warnings; a success confirmation means the saved configuration was updated.
Use this sequence for a safe catalog update:
- Upload all related models, icons, metadata, and material files for the change.
- Remove obsolete files only after their replacements have uploaded.
- Run Sync Configurator once at the end.
- Wait for Configurator Synced successfully.
- Open View and test every affected layout, ring, material quality, finish, and role.
If Sync fails, correct the reported file. Hard failures include a PMAT that is not valid JSON, a PMAT map that references a missing texture UUID, an unknown metal name in an older tree, or a duplicate upgrade destination. A misspelled root or a base with no variant may instead make the expected option disappear from the published catalog. Do not bump the schema version by hand; repair the tree and retry Sync.
Preview your changes
With the project open, click the View button in the toolbar. The configurator opens in a new tab, loaded with your current profiles, materials, icons, and diamonds - exactly what your shoppers will see. Use it to confirm every change before you deploy.
Manage project settings and access
The Wedding Band project folder supports a few different management actions:
| Action | Purpose |
|---|---|
| View | Opens the current configurator in a new tab using the saved project configuration |
| Edit Default Settings | Opens Mini Editor for Try-On, scene, camera, branding, embed defaults, band materials and variants, outside/inside features, UI option lists, engraving, limits, and theme; it does not manage asset files or separation-preset definitions |
| Sync Configurator | Upgrades an older material tree when necessary, validates PMATs, rebuilds folder-backed catalogs, and saves the project configuration after success |
| Make Public / Share | Allows the project to be loaded through a share URL, hosted embed, or public SDK integration |
Saving default settings also marks those folder settings as public so the published viewer can resolve them. Always preview after saving project defaults; scene changes and catalog Sync update different parts of the same stored configuration.
Configure Try-On in default settings
Wedding Band projects use Edit Default Settings for Try-On. They do not use the Open In → Editor or Open In → Playground actions shown for a Ring Configurator.
- Select the Wedding Band project folder in your Drive.
- Select Edit Default Settings from its menu.
- In Mini Editor, select the band that you want to use for calibration.
- Open TryOn Settings.
- Turn on Enable AR.
- Select Enter Setup.
- Use Auto Fit, then correct the size, position, and rotation if necessary.
- Select Exit Setup and Preview in AR.
- Save the default settings.
One saved fit applies to the complete Wedding Band project. A linked pair asks the customer which ring to try on. A single ring or unlinked pair opens the ring that the customer selected.
The builder supplies its generated geometry directly to Try-On. You do not need a separate GLB for either band. See Prepare a Try-On Project for the fitting controls and test procedure.
Saved designs in default settings
Edit Default Settings also has a Saved designs panel. It lists the designs saved against this project and opens any of them for editing.
The panel names where each save goes. On iJewel3D Platform a design saves into the project, so it appears in every embed of that project. In an embed with no design host, a save stays in that browser. See The project design catalogue for the host your own page supplies.
The generated embed code carries a shared design through to the iframe, so a link you paste into it opens that design.
Material controls in Mini Editor
Mini Editor reads the same catalog as the viewer. Each active partition slot has its own base material, variant, and supported finish. Changing a base updates its variant and finish choices. A material without a finish axis shows no finish options.
The Outside & Inside Features section configures:
- up to three free-positioned outer inlays;
- one overlay on each rim, including partial rim-face coverage; and
- a full-width or centered partial sleeve on the bore.
Every feature uses the materials allowed by its usage role. Mini Editor saves all feature fields in the band's default state and applies the complete set in one rebuild. Preview these features with a circular path and a vertical-style division. Axial, diagonal, and wavy divisions do not render them.
Configure Wedding Band behavior
The project created by Drive stores much more than asset URLs. Its Wedding Band configuration includes global defaults and an independent state for each included band.
Project-level behavior
| Area | Stored behavior |
|---|---|
| Layout and opening rings | Panel/Boutique with Her, His, or both; Modern Metals with one neutral ring |
| Geometry root | Root scale and automatic-fit behavior |
| Catalogs | Profiles, materials, qualities, finishes, paths, ring catalog, diamonds, icons, and separation presets |
| Presentation | Per-band position and rotation plus the built-in UI assets |
| Viewer defaults | Scene, material, camera, branding, and embed settings |
Per-band defaults

Each included band can start with its own:
- display name, physical base width, and physical base thickness;
- profile and width/height multipliers;
- ring size;
- one-, two-, or three-color partition;
- active material slot plus base, variant/quality, and finish selections;
- outside inlays, left/right overlays, and a full or partial inside sleeve;
- diamond setting type, span, spacing, count, stone size, and placement;
- edge type and edge side;
- polished-interior and split-at-groove choices;
- straight or wavy grooves, including frequency, amplitude, and split mode;
- engraving text, font, font size, and profile-specific vertical placement; and
- position and rotation in a two-band presentation.
Panel and Boutique can start with Her and His rings linked so matching design changes mirror between them while ring size and engraving remain personal. Modern Metals always starts with one unlinked neutral ring.
Catalog changes versus runtime changes
Use Drive Sync for folder-derived asset catalogs. Use Mini Editor for the supported behavior and default fields. Use the Wedding Band controller in your storefront for a customer's current selections.
| Task | Correct layer |
|---|---|
| Add a profile, material, quality, finish PMAT, icon mapping, path, catalog ring, or diamond asset | Drive folders, then Sync |
| Change a separation-preset definition | Project configuration/support update; the placeholder folder is not read by Sync |
| Set the initial layout or opening ring state | Project creation and project defaults |
| Change width, material, diamonds, engraving, or ring size while shopping | Wedding Band controller API |
| Read price, dimensions, snapshot, or manufacturing data | Wedding Band controller API |
| Save a customer's chosen configuration | exportConfig() in the integration for the order record, plus api.toJSON() when you must restore the exact design |
Platform operations are not browser SDK methods
iJewel Drive internally provisions the starter project, migrates old material trees, derives asset catalogs from folders, and saves the rebuilt plugin configuration. Those platform operations are used by New Wedding Band and Sync Configurator; they are not exposed on the storefront controller. Do not call Drive's internal setup or sync functions from customer-facing HTML. The public browser surface begins with viewer.getPluginByType('WeddingBandBuilder').controller.
Maintainer implementation mapping
The current Drive frontend implements this workflow with four Wedding Band-specific operations:
| Internal operation | Drive feature | Responsibility |
|---|---|---|
setupWeddingBandBuilder | New Wedding Band | Creates the special folder, applies the chosen layout/ring mode, creates the asset tree, and copies starter assets |
migrateWeddingBandMaterials | Sync upgrade | Moves an older finish-centric PMAT tree into the base/variant tree; safe to retry after failure |
getWeddingBandBuilderConfig | Sync discovery | Reads nested files, validates PMATs, and derives every supported folder-backed catalog while preserving behavior fields |
updateWeddingBandBuilderConfigurator | Sync Configurator | Runs the upgrade step, publishes catalogs, and saves the project configuration only after success |
These names describe the platform implementation and can change independently of the public Wedding Band controller API.
Validate the finished project
Before publishing, check:
- the selected layout opens with the expected ring mode;
- Panel/Boutique show the selected Her/His rings, while Modern Metals shows one neutral ring with no add-ring control;
- every profile has the intended model, icon, width, thickness, and engraving placement;
- every material appears only in intended
usageroles; - every quality/variant exposes only PMAT-backed finishes and has a polished interior fallback where required;
- 1 Color, 2 Color, and 3 Color partitions map to the intended material slots;
- edge, groove, diamond, and engraving options stay within manufacturable limits;
- price and weight update after geometry, metal, and diamond changes;
- the scene, logo, controls, and camera work on desktop and mobile; and
- the hosted/share URL works in a private browser window without your Drive login.
For integration testing, use the matching maintained example:
| Integration | Live page | Source |
|---|---|---|
| Published Drive file | Open live | View source |
| Built-in UI | Open live | View source |
| Custom UI | Open live | Browse source |
| iframe host controls | Open live | Browse source |
- Pricing and weight: Pricing Engine
- Colors and branding: Theming & Branding
- Asset concepts and requirements: Assets Setup
- Runnable integrations: Wedding Band Starter Templates
Next steps
Once the project and its assets look right in View, continue to Quick Start to choose a share link, iframe, or script-tag integration. Use Deployment afterward for production hosting and release guidance.